Most Important Tips to Draw Front Elevation Designs in AutoCAD

Here we have a basic elevation in which the essential is represented:

Front Elevation 2D Designs

Front Elevation 2D Designs - AutoCAD File

We are going to use this project that as you can see is quite simple (it is a house from the Raw Architects Workshop studio chosen precisely for its simplicity and didactic potential).

Now we add a little more complexity to the detail: we apply materiality to the elevation through a heterogeneous-looking shading using the AutoCAD Super Hatch command explained in the Mini Course included in the Material Pack for AutoCAD.

But a project like this in which there are planes with different directions can give us a lot of play when it comes to representing it. We can also achieve similar effects with more regular projects if we choose an oblique view to represent it.

In this way what we are going to do (after checking the rudimentary aspect of the previous shading and erasing it) is going to be to apply shading in the different directions of the planes: in this case we tilt the shading on the roofs and apply a non-uniform scale shading (altering only the X factor) on oblique walls for a more realistic effect. Again, this is all explained Material for AutoCAD.

Now finally we are going to squeeze a little more the quality of inclined planes that this project presents by changing the color of the different surfaces to achieve a realistic light configuration:

Now we have an elevation in which the materiality and irregular configuration of the project are enhanced.
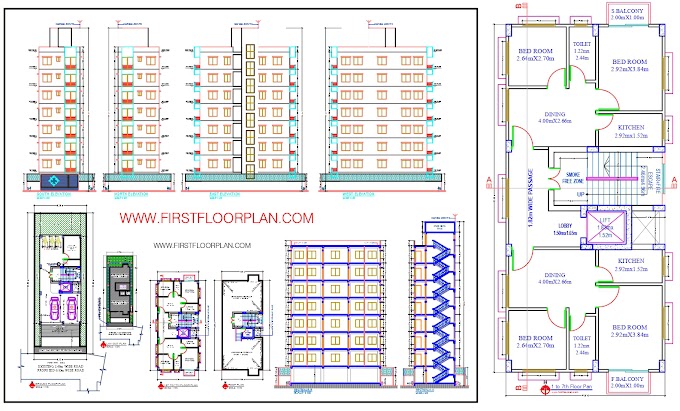
Draw Front Elevation in AutoCAD

How to Draw Front Elevation in AutoCAD


17 comments:

  1. It's great that you found the article fascinating That is a great point that I hadn't considered before. Your contribution broadens the scope of the debate. I appreciate how you expressed yourself. You've made some excellent points here. Thank you for providing such valuable information. I learned something from your blog. Keep spreading the word.

    ReplyDelete
  2. "Wow, this blog post is incredibly inspiring! Your words have uplifted my spirits and motivated me to pursue my dreams with renewed determination. Thank you for sharing such a positive message!"Order of Protection New Jersey

    ReplyDelete
  3. Good blog. I appreciate you sharing with us. Such fascinating details. Abogado Tráfico Condado Fairfax

    ReplyDelete
  4. It's fascinating to delve into the first-floor plan of a house. The foundation of any great home design, the first floor layout sets the tone for functionality and aesthetics.

    ReplyDelete
  5. Your blog on drawing front elevation designs in AutoCAD is a goldmine of practical tips and insights for budding architects and designers like myself. The step-by-step breakdown and emphasis on crucial details make it an invaluable resource for anyone looking to master this aspect of architectural design. Keep sharing like this blog. Abogado de Delitos Sexuales Fairfax VA

    ReplyDelete
  6. This article on drawing front elevation is incredibly informative! The tips provided are clear and concise, making it easy for anyone to understand. Thanks for sharing such valuable insights!
    virginia child protective order

    ReplyDelete
  7. Explore the significance of scale, precision, and layer management in achieving professional-looking elevation drawings. Learn how to effectively use AutoCAD commands to streamline your workflow and enhance the accuracy of your designs. Plus, discover creative tips for adding depth, texture, and realism to your elevation drawings.chapter 7 bankruptcy lawyer near me

    ReplyDelete
  8. The section about drawing front elevations is quite helpful! The advice given is clear and succinct, making it simple for everyone to understand. Thank you for sharing such useful information!Abogados Criminal en el Condado de Prince William

    ReplyDelete
  9. This is really helpful. Thanks for sharing this useful information.

    ReplyDelete
  10. Thanks for sharing insightful article. I really liked your blog. Fairfax County Criminal Defense Lawyer

    ReplyDelete
  11. Thank you for sharing these essential tips for drawing front elevations! As an architecture enthusiast, I'm always looking to improve my skills, and these insights are incredibly valuable. how to extend a protective order in virginia

    ReplyDelete
  12. AutoCAD is a powerful software for creating front elevation designs. To create a realistic representation of a building, it is essential to use precise measurements, organize elements into layers, use reference lines for alignment, and use AutoCAD commands like Line, Polyline, Rectangle, and Circle. Apply materials and shading using AutoCAD's Super Hatch command, consider directional shading, use oblique views for planes of different directions, and experiment with color configuration. Regular check-ups and practice are crucial for maintaining accuracy and consistency. Lines can be used effectively in front elevation designs, with varying line weights to distinguish between different elements, indicating hidden or obscured elements, grid lines for alignment and proportion, detail lines for intricate features, construction lines for initial layouts, alignment lines for symmetrical positioning, contour lines for elevation changes, dimension lines for scale and context, boundary lines for boundary outlines, and consistency in line styles and weights. By following these tips, you can enhance the clarity, detail, and overall visual appeal of your elevation design. reckless driving virginia lawyer cost

    ReplyDelete
  13. Learning to draw front elevation designs in AutoCAD efficiently is key to architectural precision, just as Fute empowers skincare precision with its advanced formulations

    ReplyDelete
  14. To create compelling front elevation designs in AutoCAD, start by meticulously planning your layout and proportions. Utilize precise measurements and grids for accuracy. Employ layers effectively to organize elements and facilitate editing. Focus on detailing, ensuring clarity and coherence in your design. Utilize AutoCAD's tools for symmetry and alignment to maintain balance. Regularly save your work and utilize shortcuts to enhance efficiency. Lastly, continuously refine your skills through practice and experimentation.

    ReplyDelete
  15. Mastering front elevation designs in AutoCAD is like refining your trading skills on tiger exchange: it requires precision, strategy, and attention to detail.

    ReplyDelete
  16. Thanks for sharing these valuable tips on drawing front elevation designs in AutoCAD! The step-by-step explanation and practical examples make it easier to understand and implement. Great resource for aspiring architects
    Driving Without a License in NJ

    ReplyDelete

Write Your Comment Here..